
How to Make GRUB and Console Screen Resolution Permanent on Solaris 11.4.x

Synopsis
When you install Solaris, it automatically sets the default screen resolution for the GRUB and console screens to 1024x768 or lower, regardless of what resolutions your display actually supports. What's more, Solaris automatically sets the console output to 80 columns by 34 rows, which is a horribly small amount of text to be able to see when you're trying to work on something from the console.
To make matters worse, many (most?) laptop displays automatically stretch the output to fill the screen, making it distorted and fuzzy, which is just downright ugly. For example, here's the 1024x768 boot image on a display with a native resolution of 1024x768:
 Click the image to view it at full size
And here's the 1024x768 boot image stretched to fill a display with a native resolution of 1920x1080:
 Click the image to view it at full size
The resolution can be set fairly easily in the /rpool/boot/grub/grub.cfg file, however that file will be automatically overwritten periodically, resetting the resolutions to the defaults.
In this article, I explain how to change the resolution for the GRUB and console screens, in the grub.cfg file; then how to change them permanently so they are not reset to the defaults. For the sake of completeness, I'll show you how to permanently increase the number of columns and rows of text displayed on the console screens once you've increased your resolution.
Setting the Resolution Temporarily
This procedure can be used to set the GRUB and console screen resolutions starting from the next time you boot the machine, until the next time the grub.cfg file is regenerated.
Generally, grub.cfg won't be regenerated unless something occurs which causes a change to the boot environment, but there have been times where I have seen it regenerated for no apparent reason. So, the change you make here will have to be reapplied at some point in the future. Not a major issue, but a bit of a nuissance.
I won't go into the basics of GRUB here. I assume you have at least a cursory knowledge of what it is and how it works. If you don't, I recommend reviewing Chapter 2 - x86: Administering the GRand Unified Bootloader in the official Solaris documentation (Booting and Shutting Down Oracle Solaris 11.4 Systems) and the GNU GRUB Manual.
Oracle has made some modifications to how GRUB is administered on Solaris. Mainly they require you to use bootadm rather than the standard GRUB utilities. And the functionality provided by bootadm is very limited in terms of working with the GRUB configuration. But the GNU documentation regarding the grub.cfg file contents generally applies to the Solaris implementation, so you can edit grub.cfg directly, but remember: any changes you make will eventually be overwritten by the system.
On Solaris 11 systems, the grub.cfg file is located in /rpool/boot/grub/. In that file, there are two lines we're interested in.
The GRUB Screen Resolution
The first line we're interested in sets the resolution of the GRUB screen. It starts with set gfxmode. The entire line is likely:
set gfxmode "1024x768x32;1024x768x16;800x600x16;640x480x16;640x480x15;640x480x32"
What we want to do is add the resolution you want to set the GRUB screen to to the beginning of the quoted list of resolutions. So, for example, to set the default resolution to 1920x1080 with a color depth of 32 bits:
set gfxmode "1920x1080x32;1024x768x32;1024x768x16;800x600x16;640x480x16;640x480x15;640x480x32"
For further information on the value of the gfxmode property, see section 15.1.12 - gfxmode of the GNU GRUB Manual.
That's it. Next time you reboot, the GRUB screen should use the new values you specified. Assuming, of course, that your display adapter and monitor actually support the resolution you specified. If they don't then the bootloader should automatically use the next resolution in the list.
The Console Screen Resolution
Now let's look at setting the resolution for the console screen. This is, arguably, the more important of the two settings because this affects all console windows, for example if you're not running X, or when you switch to a console using the Ctrl+Alt+F# keys.
One of the reasons you might want a higher resolution console screen is because if you have to do anything from the console it's much easier to work when you have more text visible at one time. A higher resolution means the text is smaller, so you can fit more on the screen.
So, in your grub.cfg find the line which starts with set gfxpayload. It will be within a menu block, generally immediately following the $multiboot line. And, there should be one such line for each menu item block.
Just as we did with the set gfxmode, above, we want to add the new resolution as the first item in the list of supported resolutions, as such:
set gfxpayload "1920x1080x32;1024x768x32;1024x768x16;800x600x16;640x480x16;640x480x15;640x480x32"
For more information on the gfxpayload property, see section 15.1.13 - gfxpayload of the GNU GRUB Manual.
And once again, that's literally all there is to it.
So now, when you reboot, depending on what new resolution you selected, you should notice the console output text is much smaller and in the center of your display. If you set the resolution to 1920x1080, for example, you'll notice a lot of unused space on the sides of your screen. That's because, at this point, it's still using the default 80 columns by 34 rows of text so, even though the text is smaller, you still have the same amount of text visible on the screen. In the next section I'll tell you how to increase that so it uses the full width and height of your wonderful high-resolution screen.
Making the Resolution Permanent
It's all fine and great that we're able to change the GRUB and console screen resolutions, but it's a heck of a nuisance that we have to redo it every time bootadm resets it. One reason it's such a nuisance is because you won't realize the resolution has changed until the next time you boot the machine, and then you have to wait for it to boot, then reapply the settings, then reboot again because the settings don't take effect until the next boot.
You would think bootadm would provide a subcommand to permanently set the GRUB and console screen resolutions but, alas, it does not. And what's even stranger is that the values it keeps resetting gfxmode and gfxpayload to are actually hard coded in a Python script which bootadm calls.
So yes, in order to make your preferred GRUB and console screen resolutions permanent, you'll need to make a change similar to what you made in the grub.cfg, in a Python script.
The file we need to add the new resolution to is /usr/lib/python3.7/vendor-packages/bootmgmt/backend/loader/grub2.py.
Look for the line which starts with GFX_MODELIST = . It's probably on, or around, line 107. The entire expression should be something like:
GFX_MODELIST = "1024x768x32;1024x768x16;800x600x16;640x480x16;" \
               "640x480x15;640x480x32"
And just like we did above, with the gfxmode and gfxpayload entries in the grub.cfg file, we just need to add our new, desired resolution to the beginning of the string value, as such:
GFX_MODELIST = "1920x1080x32;1024x768x32;1024x768x16;800x600x16;640x480x16;" \
               "640x480x15;640x480x32"
You might be thinking: "But jeepers, changing hard coded values directly in the source code... That's pretty scary." Relax! It's just Python! And you can always make a backup/copy of the original, unmodified file if you're concerned about jacking something up.
I've looked through the Python code, to find a place where it might provide the option of loading this value from an external configuration, but it looks like this hard coded assignment is the only source of the value.
Anyway, by adding your desired resolution to the start of the GFX_MODELIST variable in grub2.py, then every time grub.cfg is regenerated it will start with the resolution you specified.
So there you have it: That's how you change the GRUB and console resolutions permanently (well, permanently until the next time you reinstall the OS, anyway).
Increasing the Console Text Columns and Rows
Increasing the console screen resolution, while leaving the number of columns (or characters) and rows (or lines) at 80x34 isn't very helpful though, because even though the text may appear clearer, smoother, and smaller, the amount of text on the screen will be the same ... just smaller and clearer and smoother.
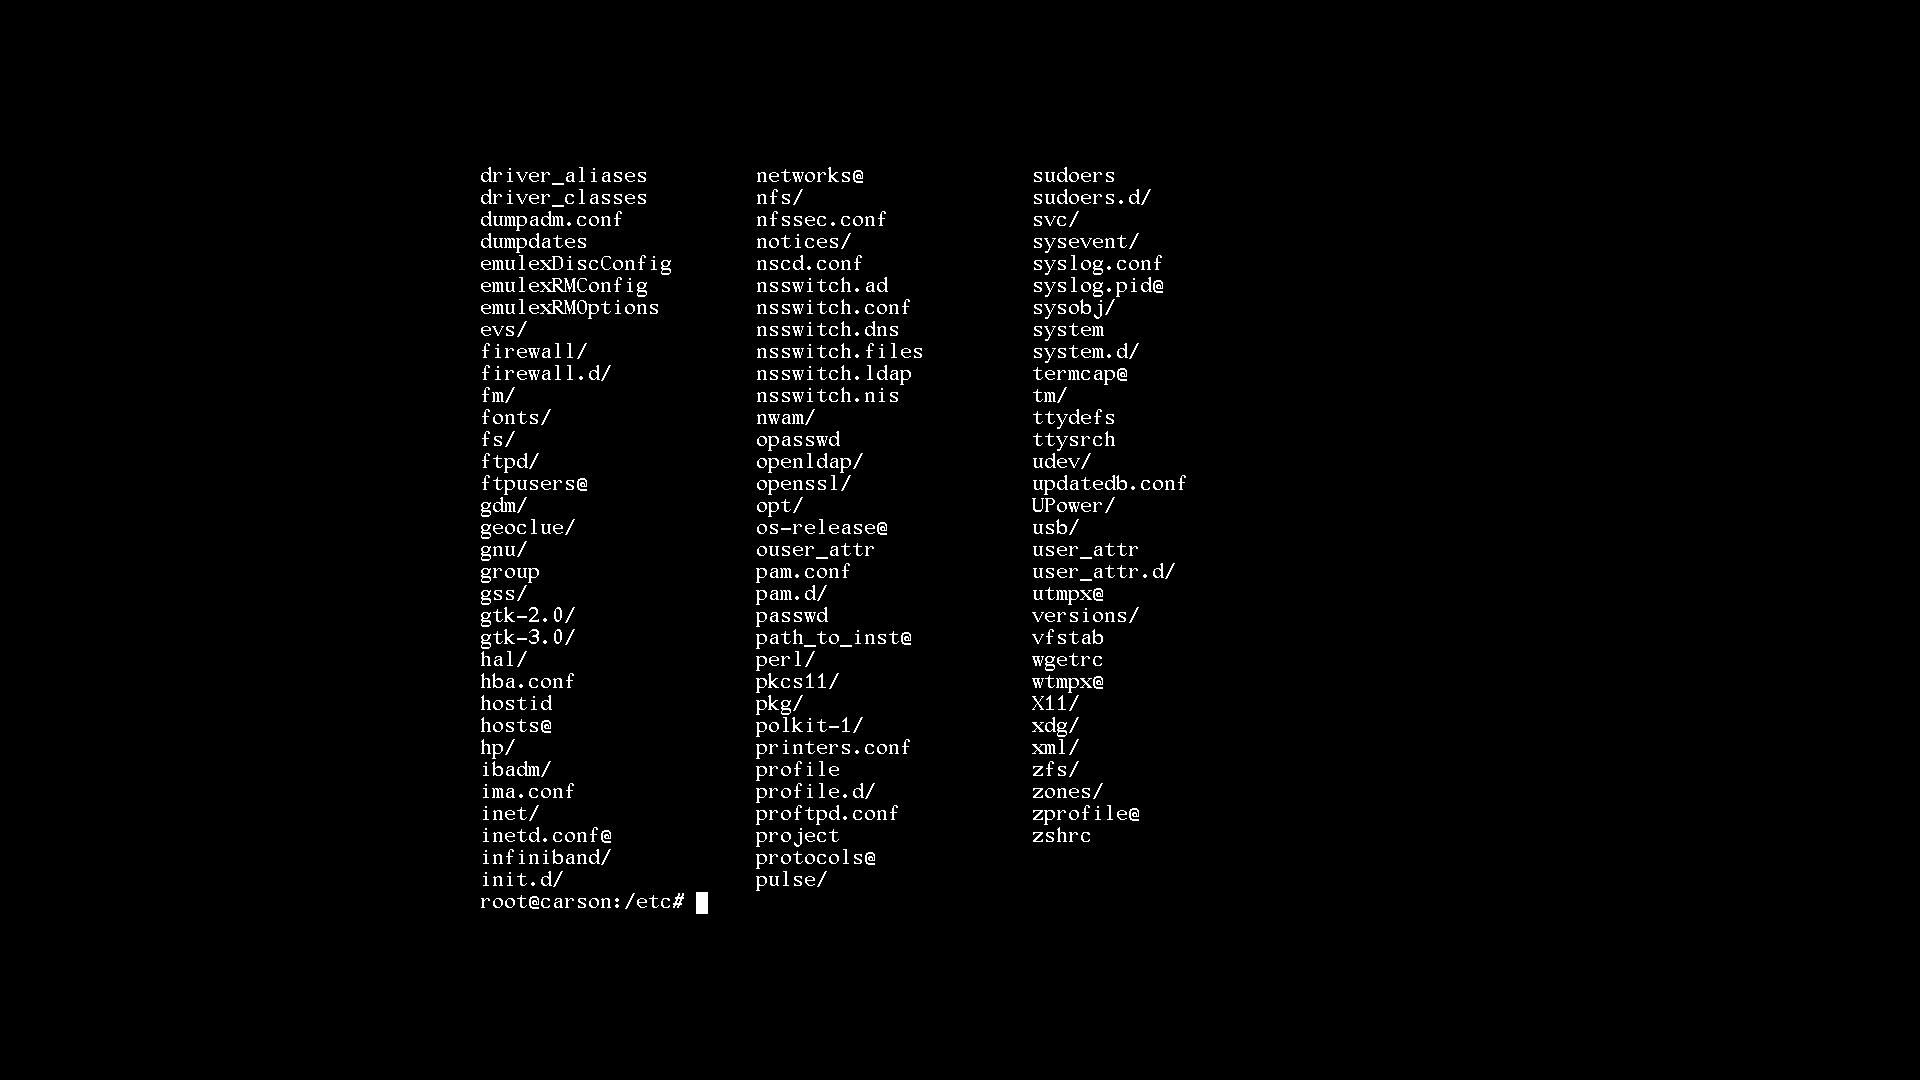
So here we'll look at how to increase the number of characters on each line, and the number of lines on the screen, so that the usable area fills the screen. For example, at 80 columns by 34 rows (80x34) on a resolution of 1920x1080, you get the following when you do an ls -F in the /etc/ directory:
 Click the image to view it at full size
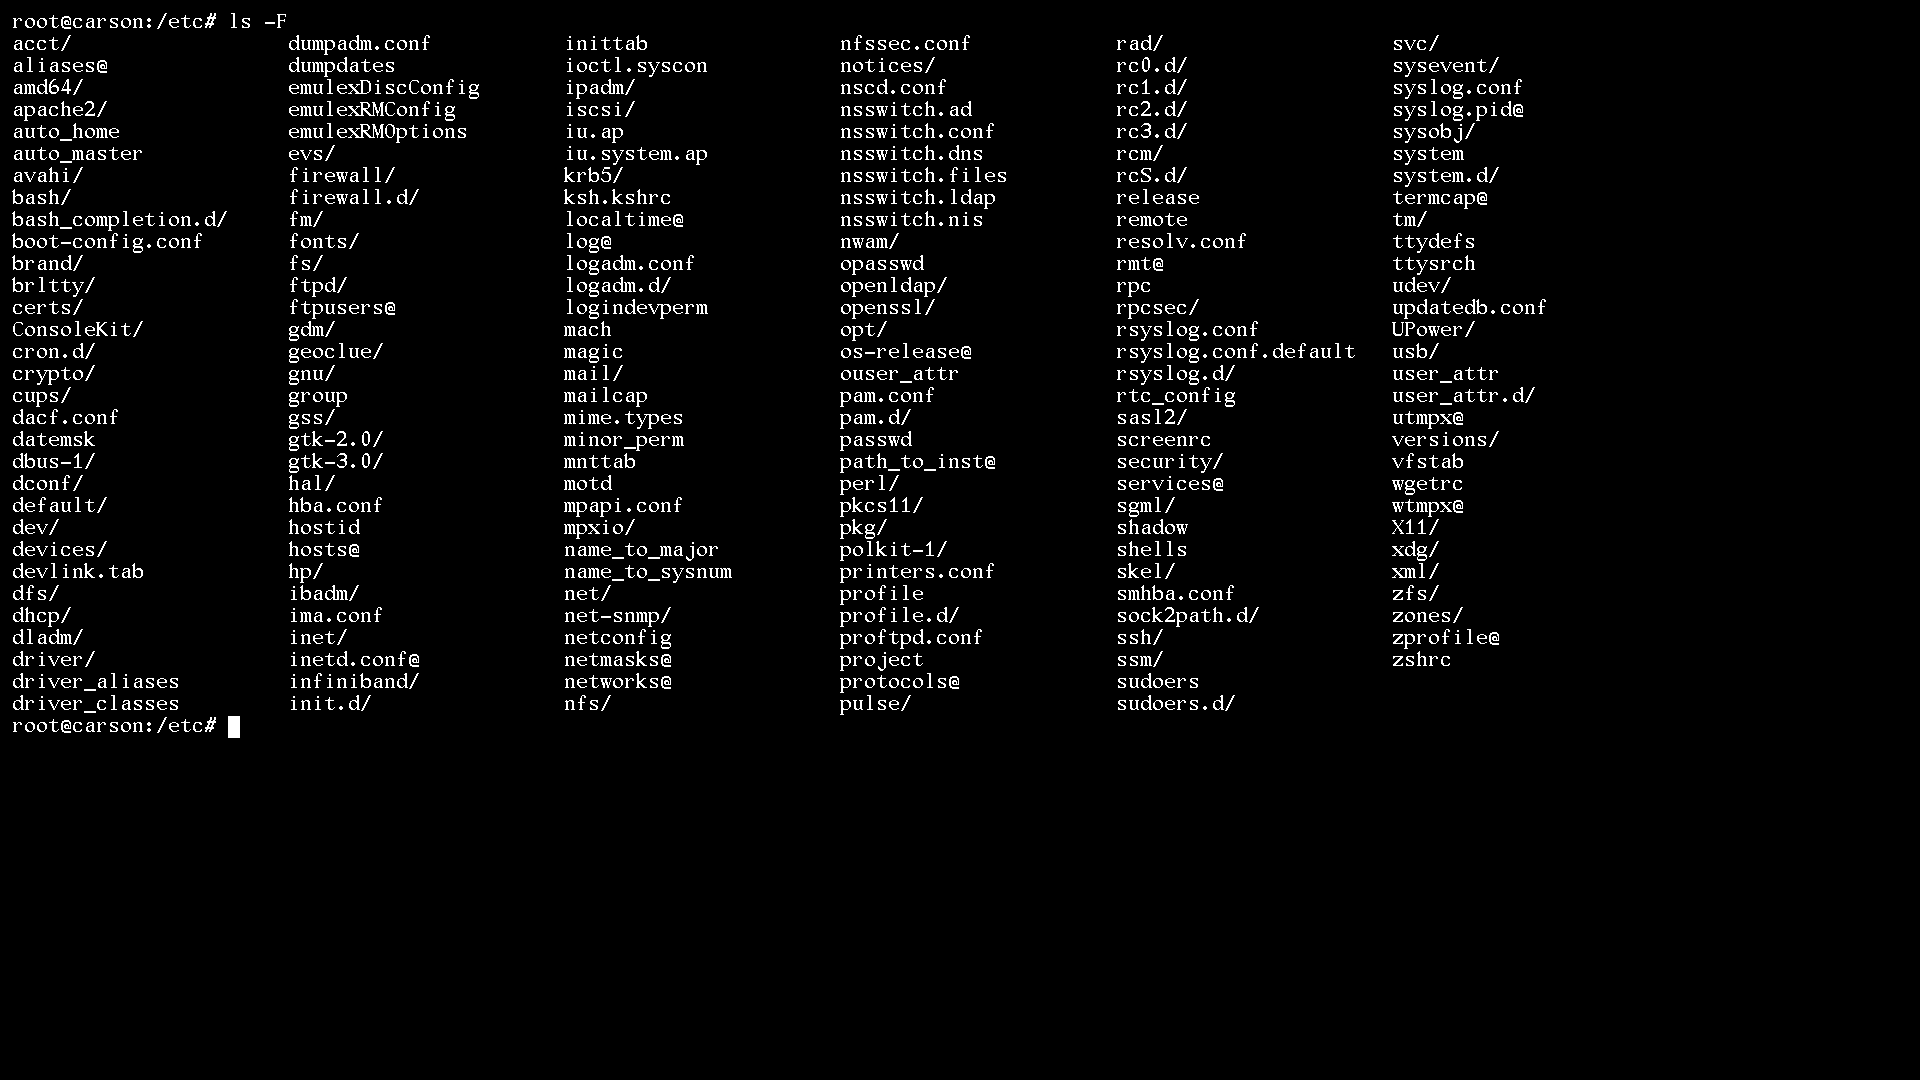
Whereas, at 158 columns by 48 rows (158x48) on a resolution of 1920x1080, you get the following output:
 Click the image to view it at full size
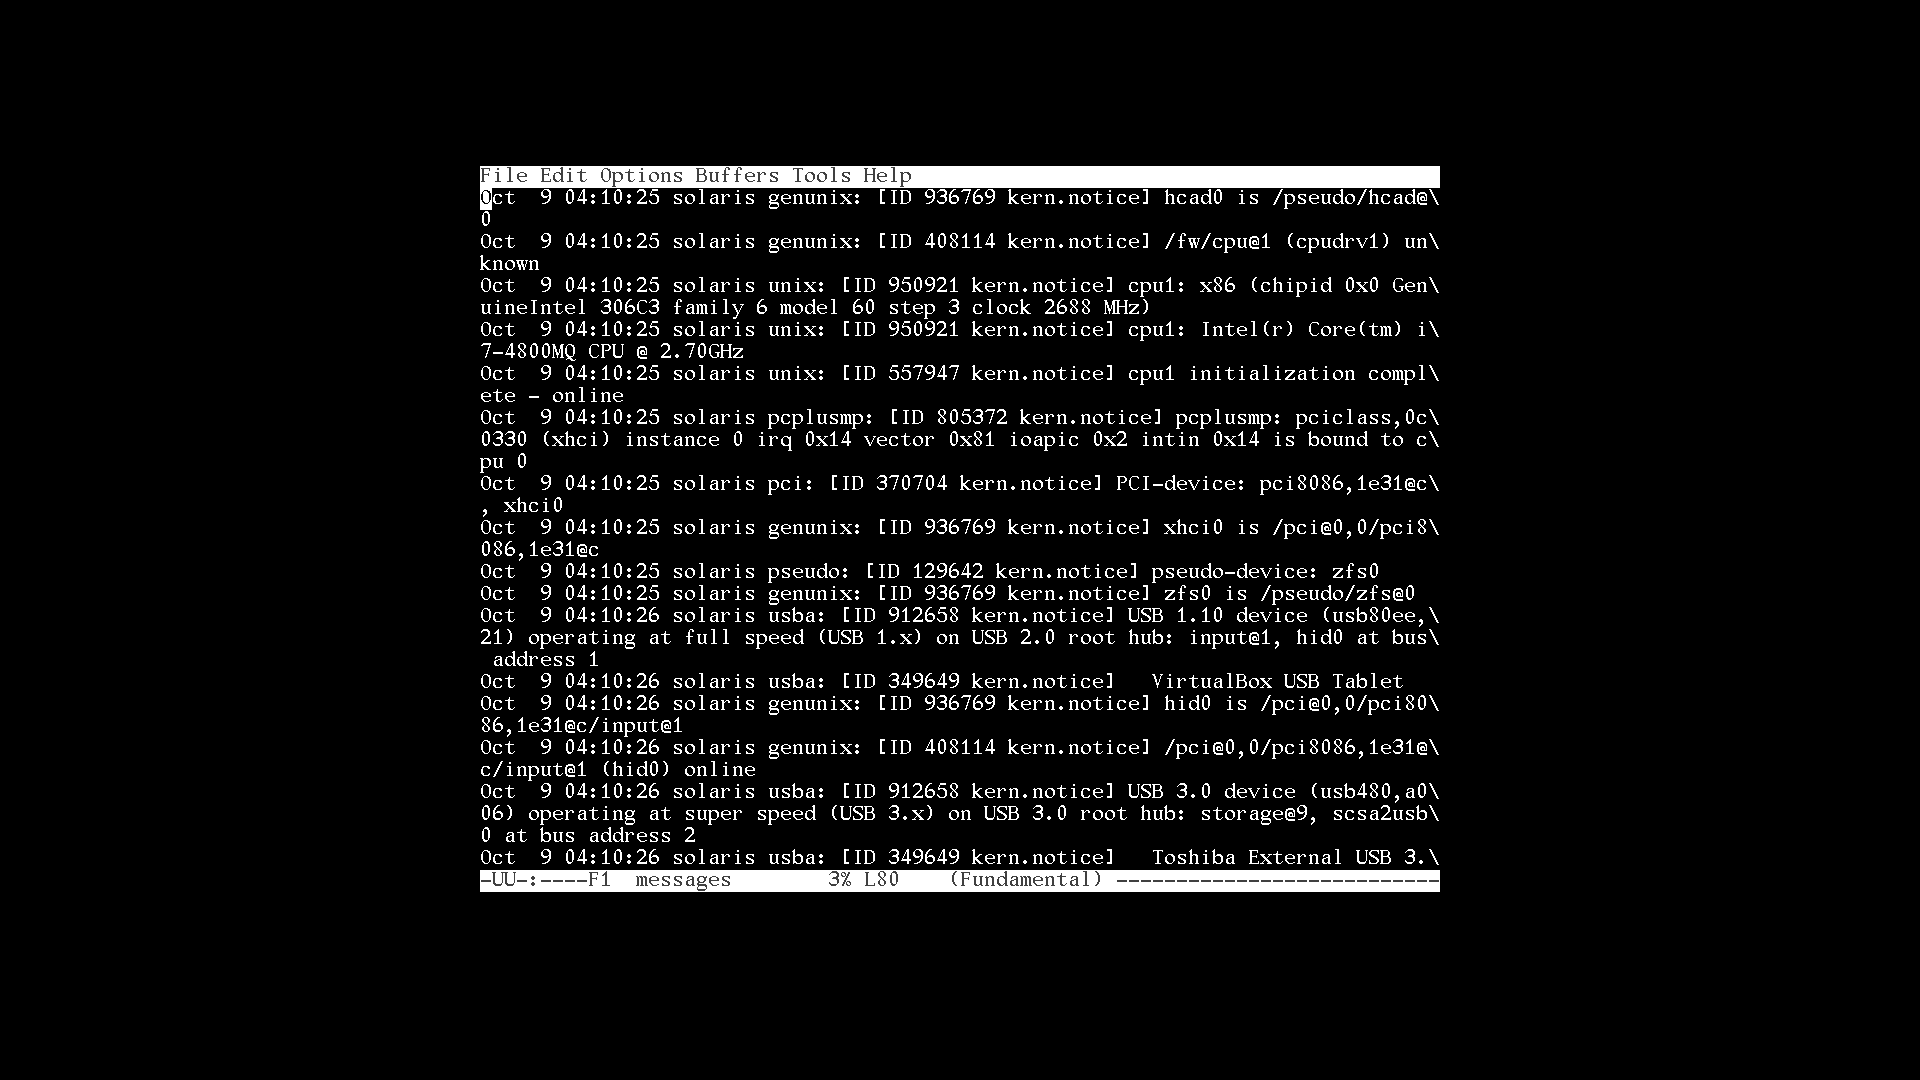
For another, more striking example, here's a screenshot of the /var/adm/messages file in emacs, at 80x34 on a 1920x1080 display:
 Click the image to view it at full size
And here's the same view of the same file, in emacs, at 158x48 on a 1920x1080 display:
 Click the image to view it at full size
You get the idea, right? Higher resolution with higher columns/rows, means more visible at one time and less line wrapping - means easier to work with, which means increased productivity.
So, to increase the columns and rows on the console screens, what you need to do is add some kernel arguments to the line in grub.cfg which loads the kernel. That's the line which starts with $multiboot.
The first argument, which may already be present in your grub.cfg, is console=graphics or console=text. Using graphics will cause a pretty Oracle Solaris splash screen with a spinning cube to be displayed during boot. Whereas, text will display the usual boot messages that we love to read while the machine boots. You can use whichever option you prefer. It really doesn't make any difference to anything.
The next two kernel arguments to pass are the number of characters (or columns) to display on each line of the console and the number of rows to display on the console. The argument names are screen-#columns and screen-#rows. The values you select for them depend on the screen resolution you're using. The higher the resolution, the more columns and rows you can fit onto the screen. For example, at 1920x1080 you can fit 159 columns by 48 rows.
The exact syntax for adding these kernel arguments is as follows:
$multiboot /ROOT/11.4.42.111.0/@/$kern $kern -B console=graphics,screen-#columns=158,screen-#rows=48 -B $zfs_bootfs
If your grub.cfg already contains the -B console=graphics (or -B console=text), then you just need to add the comma separated screen-#columns and screen-#rows arguments. If your grub.cfg doesn't contain the console argument then you must add that as well - and don't forget the -B in front of it.
And now, an interesting caveat regarding how many columns/rows will fit into a given resolution: If you specify more than will fit, then Solaris will automatically use a different, smaller font. The smaller font will likely not be the beautiful Sun-Gallant font that we all love so much. But you can fiddle around with different columns/rows values to find what suits your fancy.
Making the Columns/Rows Permanent
Unlike the GRUB and console screen resolution, bootadm does actually provide a subcommand to permanently pass the screen-#columns and screen-#rows arguments to the kernel at boot time.
You can use the bootadm change-entry command to permanently set the columns and rows, as follows:
root# bootadm change-entry -i 0 kargs="-B console=graphics,screen-#columns=158,screen-#rows=48"
Where -i 0 refers to the entry number of the menu entry you want to change the kernel arguments for. See the bootadm man page for more information on using bootadm.
And so, now you know how to change the screen resolution for the GRUB and console screens, and how to increase the number of columns and rows on the console screens.
Comments